根据提示,换了下bundle ID,卸载真机上已安装的app,重新部署安装,仍然报错,无法部署。于是去看了下配置文件,发现provisioning profile报错,需要重新登录Apple ID,重新登录后,再次部署,并在真机上设置信任当前Apple ID,问题解决。
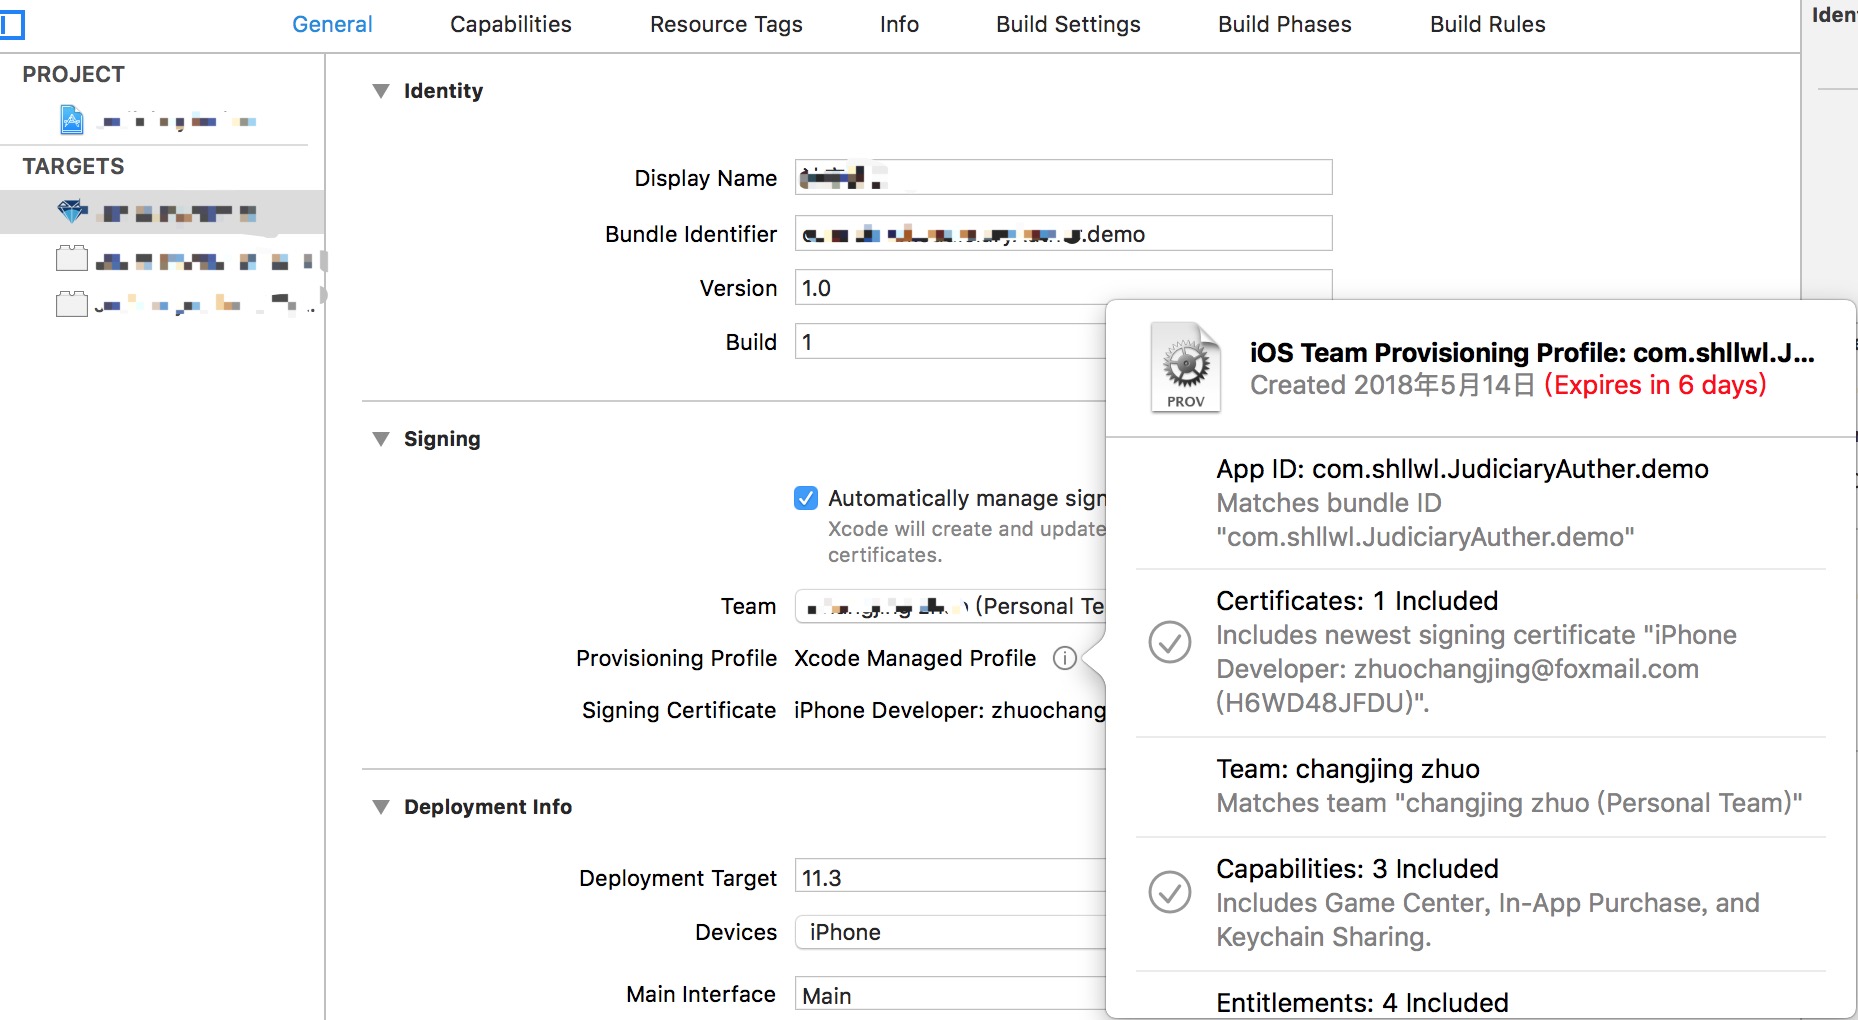
但是问题真的解决了吗?然后我仔细去看了下配置文件,终于找到问题原因,原来debug app的Provisioning profile是有过期时间的。如下图所示:
根据提示,换了下bundle ID,卸载真机上已安装的app,重新部署安装,仍然报错,无法部署。于是去看了下配置文件,发现provisioning profile报错,需要重新登录Apple ID,重新登录后,再次部署,并在真机上设置信任当前Apple ID,问题解决。
但是问题真的解决了吗?然后我仔细去看了下配置文件,终于找到问题原因,原来debug app的Provisioning profile是有过期时间的。如下图所示:
| 中心 | 3.5L箱子(条码) | 8L箱子(条码) | 15L箱子(条码) | 20L箱子(条码) |
|---|---|---|---|---|
| 浙江物流一区 | 6个(X04571301-X04571306) | 8个(X03571301-X03571308) | 4个(X02571301-X02571304) | 12个(X01571301-X01571312) |
| 浙江物流二区 | 24个(X04571401-X04571424) | 42个(X03571401-X03571442) | 78个(X02571401-X02571478) | 36个(X01571401-X01571436) |
这样的数据,首先想到的是在我的macOS上连上服务器数据库,然后把数据一条一条insert进去。但是我insert了几十条后,我发现业务部门给的数据累计有700多条。我当然不愿意就这样老老实实的一条一条insert了,因为实在是太耗费时间了。
根据以往的经验,最先想到的是,把表导入到navicat里,然后生成批量sql插入脚本,再传到服务器上去执行。但是,业务部门给的Excel并不是标准的一条一条的数据展示的,而是像上面那样给定箱子条码范围和数量。这样,我还得先给它生成一个标准的Excel,也比较麻烦。
然后我想到用写程序的方式,写循环,连接数据库插入数据。但是本地环境去连接生产环境的数据库是需要走流程申请权限的,可能流程要走个一两天,业务部门又急着要这个数据,这种方法又要摒弃掉了,只能使用下面一种方案了。
CREATE FUNCTION func_name ( [func_parameter] ) //括号是必须的,参数是可选的
RETURNS type
[ characteristic ...] routine_body
首先,我把服务器数据库这张表的表结构拷到了本地,便于本地调试所写function是否正确。该表结构与所需要插入的数据相关的字段有三个:
ybxtm, dept_id, box_size //ybxtm对应箱子条码, dept_id对应上面数据的中心, box_size对应箱子规格(3.5L, 8L, 15L, 20L)
然后,实现function实现及调用:
        DELIMITER $$ /*定义分隔符,用于在Linux环境下防止function定义的内部分号造成的中途输出*/
        CREATE FUNCTION addData(deptId INT, boxSize DOUBLE, ybxtm VARCHAR(20), amount INT)
          RETURNS INT DETERMINISTIC /*该参数需要指定,不指定Linux环境下执行时会提示你需要指定function的characteristic*/
          BEGIN
            DECLARE i INT DEFAULT 1;
            DECLARE result INT DEFAULT 1;
            DECLARE sampleBoxNum VARCHAR(20) DEFAULT '';
            myloop: LOOP
              SET sampleBoxNum = ybxtm;
              IF i > amount
              THEN LEAVE myloop;
              END IF;
              IF i < 10
              THEN SET sampleBoxNum = concat(sampleBoxNum, concat('0', i));
              ELSE
                SET sampleBoxNum = concat(sampleBoxNum, i);
              END IF;
              INSERT INTO lx_ybx (ybxtm, dept_id, box_size) VALUES (sampleBoxNum, deptId, boxSize);
              SET result = result + 1;
              SET i = i + 1;
            END LOOP myloop;
            RETURN result - 1;
          END $$ /*结束时需要挂上分隔符,告诉Linux终端,function定义结束*/

        /*调用function*/
        SELECT addData(29, 20, 'X025714', 78);
但当我这样做时, 我发现一个非常让我懊恼的问题, 当我鼠标悬停时, 出现的弹框中显示 Fetching Documentation..., 并且它会显示很长一段时间.
问题总是得解决的,经过一番搜索,我找到了问题的解决方法:修改配置文件。修改方法如下:
修改前的节点如下所示:
        <javadocPath>
          <root type="composite">
            <root type="simple" url="http://developer.android.com/reference/" />
          </root>
        </javadocPath>
        <sourcePath>
          <root type="composite">
            <root type="simple" url="file://``USER_HOME``/Library/Android/sdk/sources/android-26" />
          </root>
        </sourcePath>
在上面修改前的节点中,javadocPath在找android developer官网上的doc,由于网络的原因(某墙),肯定很难fetching到documentation。所以将url修改为下载到本地的源码(去本地源码中fetching documentation自然很快),如下所示:
        <javadocPath>
          <root type="composite">
            <root type="simple" url="file://``USER_HOME``/Library/Android/sdk/sources/android-26" />
          </root>
        </javadocPath>
        <sourcePath>
          <root type="composite">
            <root type="simple" url="file://``USER_HOME``/Library/Android/sdk/sources/android-26" />
          </root>
        </sourcePath>
修改完之后,需要重启下AS,fetching documentation就会很快了(不是很快,是非常快!)。
]]>经过一番搜索,我找到了解决方法,我们可以先在.gitignore中加入该文件的忽略规则,如下所示:
.DS_Store
然后删除项目中所有的 .DS_Store,在项目目录下执行如下命令:
find . -name .DS_Store -print0 | xargs -0 git rm -f --ignore-unmatch
然后提交项目即可。
但是,我发现我的项目是用 WebStorm 打开的,项目目录下自动生成了 .idea 文件,每次提交 .idea 文件也会提交,加入忽略规则也不行,我想到了和上面类似的方法,删除 .idea 目录,然后再提交,即可解决。
参考链接:
]]>经过一番搜索发现,Java官网的帮助中心中介绍推荐使用IE(windows)和Safari(Mac os)(参见链接:https://www.java.com/zh_CN/download/faq/chrome.xml),由于自己家里电脑是Mac os(Mac OS 10.12.6),所以使用Safari(自己电脑当前版本是11.0)来打开浏览器Java支持。
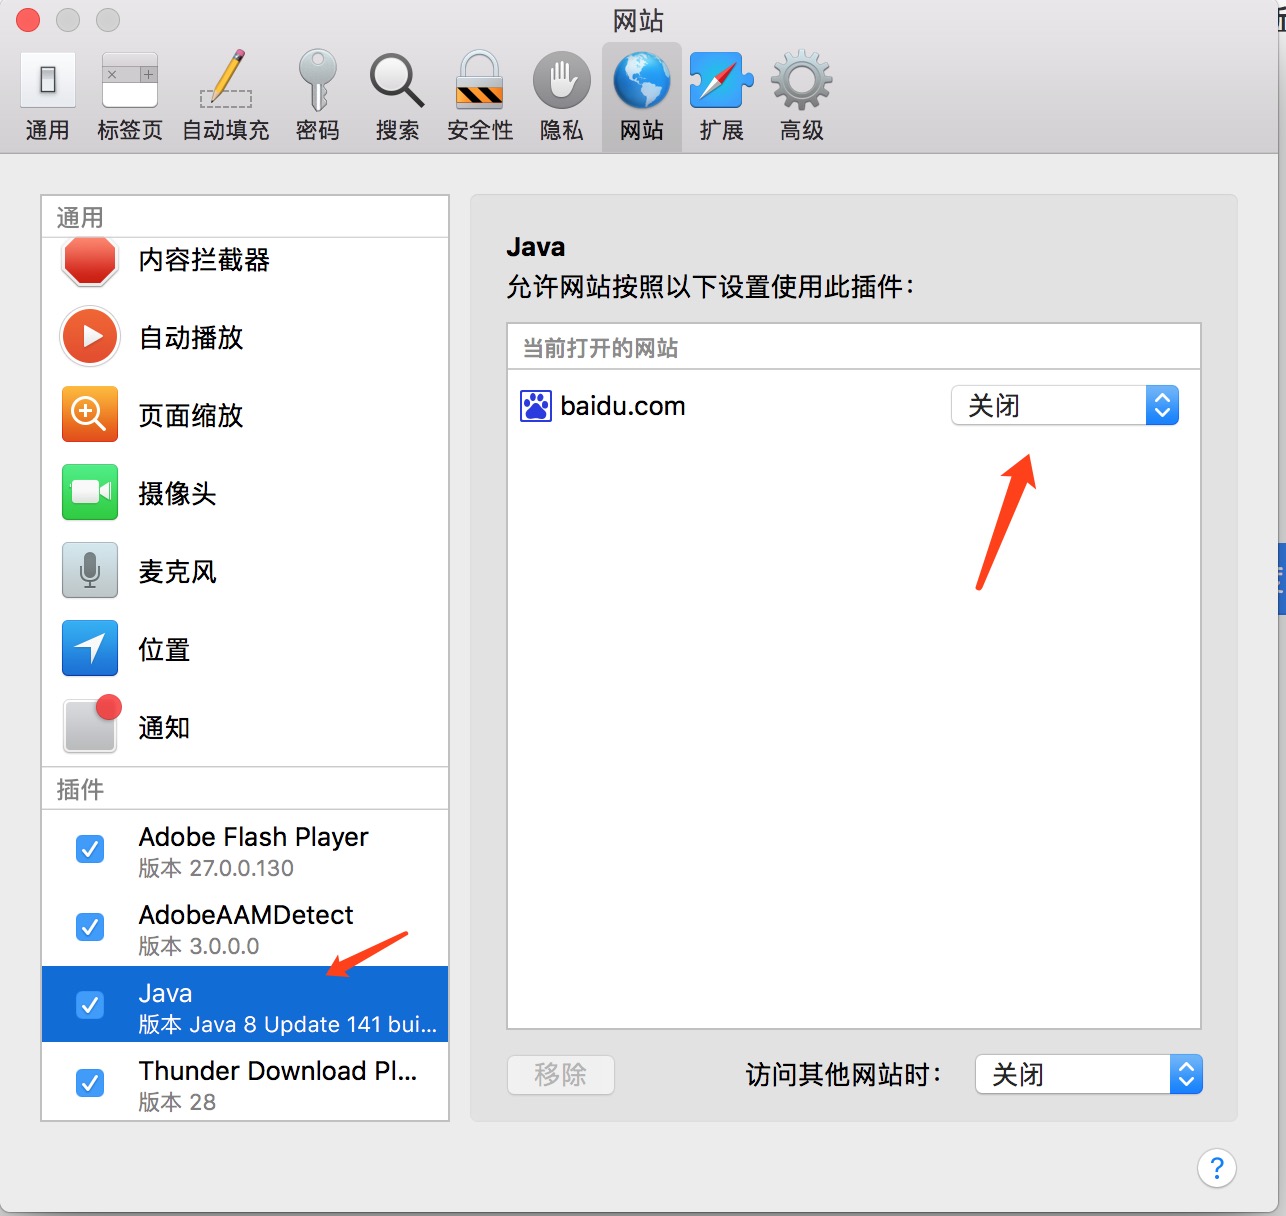
在Safari中如何打开浏览器Java支持呢?经过一番搜索,发现可以在Safari的偏好设置中的网站选项去打开Java支持,针对某个网站去打开即可,如下图所示:
当放置在项目的根目录下,app的build.gradle文件中配置(该配置是通过右键项目的app模块选择 Link C++ Project with Gradle后自动生成的)如下:
 externalNativeBuild {
    cmake {
        path '../CMakeLists.txt'
    }
}
此时对项目进行build操作时,build会失败。
当尝试把CMake构建脚本放置在项目的app目录下,build就可以成功,此时app的build.gradle文件中配置如下:
 externalNativeBuild {
    cmake {
        path 'CMakeLists.txt'
    }
}
解决该问题参考了官方文档,参考链接如下:
https://developer.android.com/studio/projects/add-native-code.html
代码如下所示:
/**
 * judge that a String Array whether or not contained equal String
 *
 * @param strings
 *            a string Array
 * @return return true, contained; return false, not contained
 */
public static boolean judgeStrArrayContainsSameStr(String[] strings) {
	int len = strings.length;
	for (int i = 0; i < len; i++) {
		String temp = strings[i];
		for (int j = i + 1; j < len; j++) {
			String string = strings[j];
			if (string.equals(temp)) {
				return true;
			}
		}
	}
	return false;
}
//filename是你要上传的文件名,username是服务器主机用户名,x.x.x.x是服务器IP地址,directory是要将文件上传到服务器的directory目录下
scp [filename] [username]@x.x.x.x:[dirctory]
命令scp基于ssh协议,可以将文件拷贝到远程服务器上的指定目录,Mac os自带,使用很方便。当然还可以使用ftp/sftp方式上传。
]]>但是SQLite可以通过如下方式来实现:
1)先清空表数据:
delete from [tablename];
2)当数据库中包含自增列时,会自动建立一个名为 sqlite_sequence 的表。这个表包含两个列:name和seq。name记录自增列所在的表(即tablename),seq记录当前序号(下一条记录的编号就是当前序号加1)。你可以通过如下方式将自增量归零:
    //1. 将表名为tablename的自增量置0
    update sqlite_sequence set seq = 0 where name = 'tablename'
    //2. 将表名为tablename的记录删除
    delete from sqlite_sequence where name = 'tablename'
    //3. 将sqlite_sequence表清空数据
    delete from sqlite_sequence
虽然在普通的DBMS中,用delete不如用truncate快,但是SQLite对delete做了优化,这个优化也可以使它运行的很快。
]]>输入下面的命令可以查看:
Last login: Thu Jun 15 10:02:21 on ttys000
JackRodeMacBook-Pro:~ jack$ adb shell
generic_x86_64:/ $ cd /data/data/cn.jackro.databasedemo/databases/
/system/bin/sh: cd: /data/data/cn.jackro.databasedemo/databases:     Permission denied
2|generic_x86_64:/ $
但是当执行cd命令切换到应用的数据库目录时,却提示Permission denied(权限拒绝),经查,可以执行su命令切换到超级用户来提高权限,访问该文件。命令如下所示:
Last login: Thu Jun 15 10:09:58 on ttys000
JackRodeMacBook-Pro:~ jack$ adb shell
generic_x86_64:/ $ cd /data/data/cn.jackro.databasedemo/databases
/system/bin/sh: cd: /data/data/cn.jackro.databasedemo/databases: Permission denied
2|generic_x86_64:/ $ su
generic_x86_64:/ # cd /data/data/cn.jackro.databasedemo/databases
generic_x86_64:/data/data/cn.jackro.databasedemo/databases # ls
BookStore.db BookStore.db-journal
generic_x86_64:/data/data/cn.jackro.databasedemo/databases #
针对这一变更,官方文档也给出了应用开发者如何改写应用的一些建议,官方文档参考:后台优化。
面向Android 7.0(API 24)及以上的应用如果在应用的AndroidManifest静态注册CONNECTIVITY_ACTION,将不会收到该广播。但是我们可以使用[Context.registerReceiver()](https://developer.android.com/reference/android/content/Context.html#registerReceiver(android.content.BroadcastReceiver, android.content.IntentFilter))动态注册CONNECTIVITY_ACTION,这将会让我们的应用在运行时收到该广播(这样也可以改善内存使用和电量消耗)。
Android 7.0(API 24)还为我们提供了JobScheduler和onStartJob()(JobService的回调方法),我们可以使用JobInfo.Builder构建一个在Unmetered Network Connection上的JobInfo对象,然后使用JobScheduler执行这个JobInfo对象,接下来就可以在onStartJob()方法里执行我们自己的逻辑。
我们还可以使用ConnectivityManager.NetworkCallback来监听网络变化,比如该接口中的onAvailable()方法。
2)ACTION_NEW_PICTURE或ACTION_NEW_VIDEO
在Android 7.0(API 24)里,这两个隐式广播被移除了,应用程序不能发送或接受这两个广播来监听系统的照片或者视频的拍摄。但是在Android 8.0(API 26),这两个广播又被添加回来了,不过也仅仅可以通过动态注册来接收,并且仅仅适用于监听到他们来执行简单的可以立即被执行的任务,执行复杂的繁重的任务仍然需要使用JobScheduler、JobInfo和onStartJob(),和上面第一点处理方法类似,不同的是,需要调用JobInfo.Builder.addTriggerContentUri()构造JobInfo对象,然后在onStartJob()回调方法里去调用JobParameters.getTriggeredContentAuthorities()和JobParameters.getTriggeredContentUris()来获取拍照或摄像时增加的照片或视频的Uri。
像上面这样优化App可以让App在低内存的设备上改善性能和用户体验(这可以改善Android应用生态环境),移除后台服务(background service)和隐式广播的依赖可以帮助你的App在这样的设备上运行的更好。虽然Android 7.0(API 24)在逐步减少这样的issue,但是我们仍然推荐你通过完全不使用这样的后台进程来优化你的App。
Android 7.0(API 24)还引入了新的adb命令来帮助你测试你的App在不使用后台进程时是否还能很好的运行。命令如下:
    //模拟隐式广播和后台服务(background service)不可用的条件
    $ adb shell cmd appops set <package_name> RUN_IN_BACKGROUND ignore
    //重新使隐式广播和后台服务(background service)可用
    $ adb shell cmd appops set <package_name> RUN_IN_BACKGROUND allow
万般无奈,只能百度,发现执行以下命令即可解决问题。
//为gradlew文件添加可执行属性
chmod +x gradlew
chmod命令是修改文件访问权限的命令,文件访问权限包括只读、只写、可执行三种,其实最开始的提示Permission denied(权限拒绝)已经告诉了我们是android项目目录下可执行文件gradlew的访问权限的问题。因此需要为该文件添加可执行权限,所以执行以上命令即可解决该问题。
]]>今天我碰到的问题是模拟器收不到本地通知,按照惯例,先上本地通知的代码:
    UILocalNotification *note = [[UILocalNotification alloc] init];
    note.alertBody = @"Hypnotize";
    note.fireDate = date; //这里date 变量是一个NSDate对象,从页面上的UIDatePicker对象上获取的
    note.applicationIconBadgeNumber = 1;
    [[UIApplication sharedApplication] scheduleLocalNotification:note];
原本以为这样就可以接收到通知了,结果一运行,始终看不到通知,过了通知的设定时间好久了,也看不到通知。查阅了下通知的用法文档,才知道需要去申请发送通知的授权。修正后的代码如下所示:
//判断是否已经授权用户发送通知
if ([[UIApplication sharedApplication] currentUserNotificationSettings].types != UIUserNotificationTypeNone) {
    UILocalNotification *note = [[UILocalNotification alloc] init];
    note.alertBody = @"Hypnotize";
    note.fireDate = date;//这里date 变量是一个NSDate对象,从页面上的UIDatePicker对象上获取的
    note.applicationIconBadgeNumber = 1;
    [[UIApplication sharedApplication] scheduleLocalNotification:note];
} else{
    //用户注册通知,注册后才能收到通知,这会给用户一个弹框,提示用户选择是否允许发送通知
    [[UIApplication sharedApplication] registerUserNotificationSettings:[UIUserNotificationSettings settingsForTypes:UIUserNotificationTypeAlert|UIUserNotificationTypeBadge|UIUserNotificationTypeSound   categories:nil]];
}
用户注册通知后,会收到一个回调函数,一般如果未授权,创建通知就在这个回调函数里进行。
//用户注册通知回调函数
- (void)application:(UIApplication *) application
    didRegisterUserNotificationSettings:(UIUserNotificationSettings   *)notificationSettings {
     if (notificationSettings.types != UIUserNotificationTypeNone) {
         NSLog(@"haha");
        UILocalNotification *note = [[UILocalNotification alloc] init];
        note.alertBody = @"Hypnotize";
        note.fireDate = rvc.selectDate;
        note.applicationIconBadgeNumber = 1;
        [[UIApplication sharedApplication] scheduleLocalNotification:note];
    }
}
#import "BNRHypnosisView.h"

@interface BNRHypnosisView()

@property(nonatomic, strong) UIColor *circleColor;

@end

@implementation BNRHypnosisView

- (void)setCircleColor:(UIColor *)circleColor {
    _circleColor = circleColor;
    [self setNeedsDisplay];
}

- (instancetype)initWithFrame:(CGRect)frame
{
    self = [super initWithFrame:frame];
    if (self) {
        self.backgroundColor = [UIColor clearColor];
        self.circleColor = [UIColor lightGrayColor];
        //self.userInteractionEnabled = YES; //开启用户交互仍然不能响应touchesBegan事件
    }
    return self;
}

- (void)drawRect:(CGRect)rect {
    CGContextRef cgContext = UIGraphicsGetCurrentContext();

    CGRect bounds = self.bounds;
    CGPoint center;
    center.x = bounds.origin.x + bounds.size.width / 2.0;
    center.y = bounds.origin.y + bounds.size.height / 2.0;

    float maxRadius = hypot(bounds.size.width, bounds.size.height) / 2.0;

    UIBezierPath *path = [[UIBezierPath alloc] init];

   for (float currentRadius = maxRadius; currentRadius > 0; currentRadius -=     20) {
        [path moveToPoint:CGPointMake(center.x + currentRadius, center.y)];
        [path addArcWithCenter:center radius:currentRadius startAngle:0.0   endAngle:M_PI*2.0 clockwise:YES];
    }

    [self.circleColor setStroke];

    path.lineWidth = 10.0;

    [path stroke];


    CGContextSaveGState(cgContext);
    CGContextSetShadow(cgContext, CGSizeMake(4, 7), 3);

    UIImage *logoImage = [UIImage imageNamed:@"logo.png"];

    [logoImage drawInRect:rect];

    CGContextRestoreGState(cgContext);
}

- (void)touchesBegan:(NSSet<UITouch *> *)touches withEvent:(UIEvent   *)event {

    NSLog(@"%@ was touched", self);

    float red = (arc4random() % 100) / 100.0;
    float green = (arc4random() % 100) / 100.0;
    float blue = (arc4random() % 100) / 100.0;

    UIColor *randomColor = [UIColor colorWithRed:red
                                       green:green blue:blue alpha:1.0];
    self.circleColor = randomColor;
}

@end
在AppDelegate中使用这个自定义UIView,代码如下所示:
- (BOOL)application:(UIApplication *)application didFinishLaunchingWithOptions:(NSDictionary *)launchOptions {
    // Override point for customization after application launch.
    self.window = [[UIWindow alloc] initWithFrame:[[UIScreen mainScreen] bounds]];

    NSArray *windows = [[UIApplication sharedApplication] windows];
    for(UIWindow *window in windows) {
        if(window.rootViewController == nil){
            UIViewController *vc = [[UIViewController alloc]initWithNibName:nil
                                                                 bundle:nil];
            window.rootViewController = vc;
        }
    }

    CGRect firstFrame = self.window.bounds;
    BNRHypnosisView *firstView = [[BNRHypnosisView alloc] initWithFrame:firstFrame];

   [self.window addSubview:firstView];


    self.window.backgroundColor = [UIColor whiteColor];
    [self.window makeKeyAndVisible];
    return YES;
}
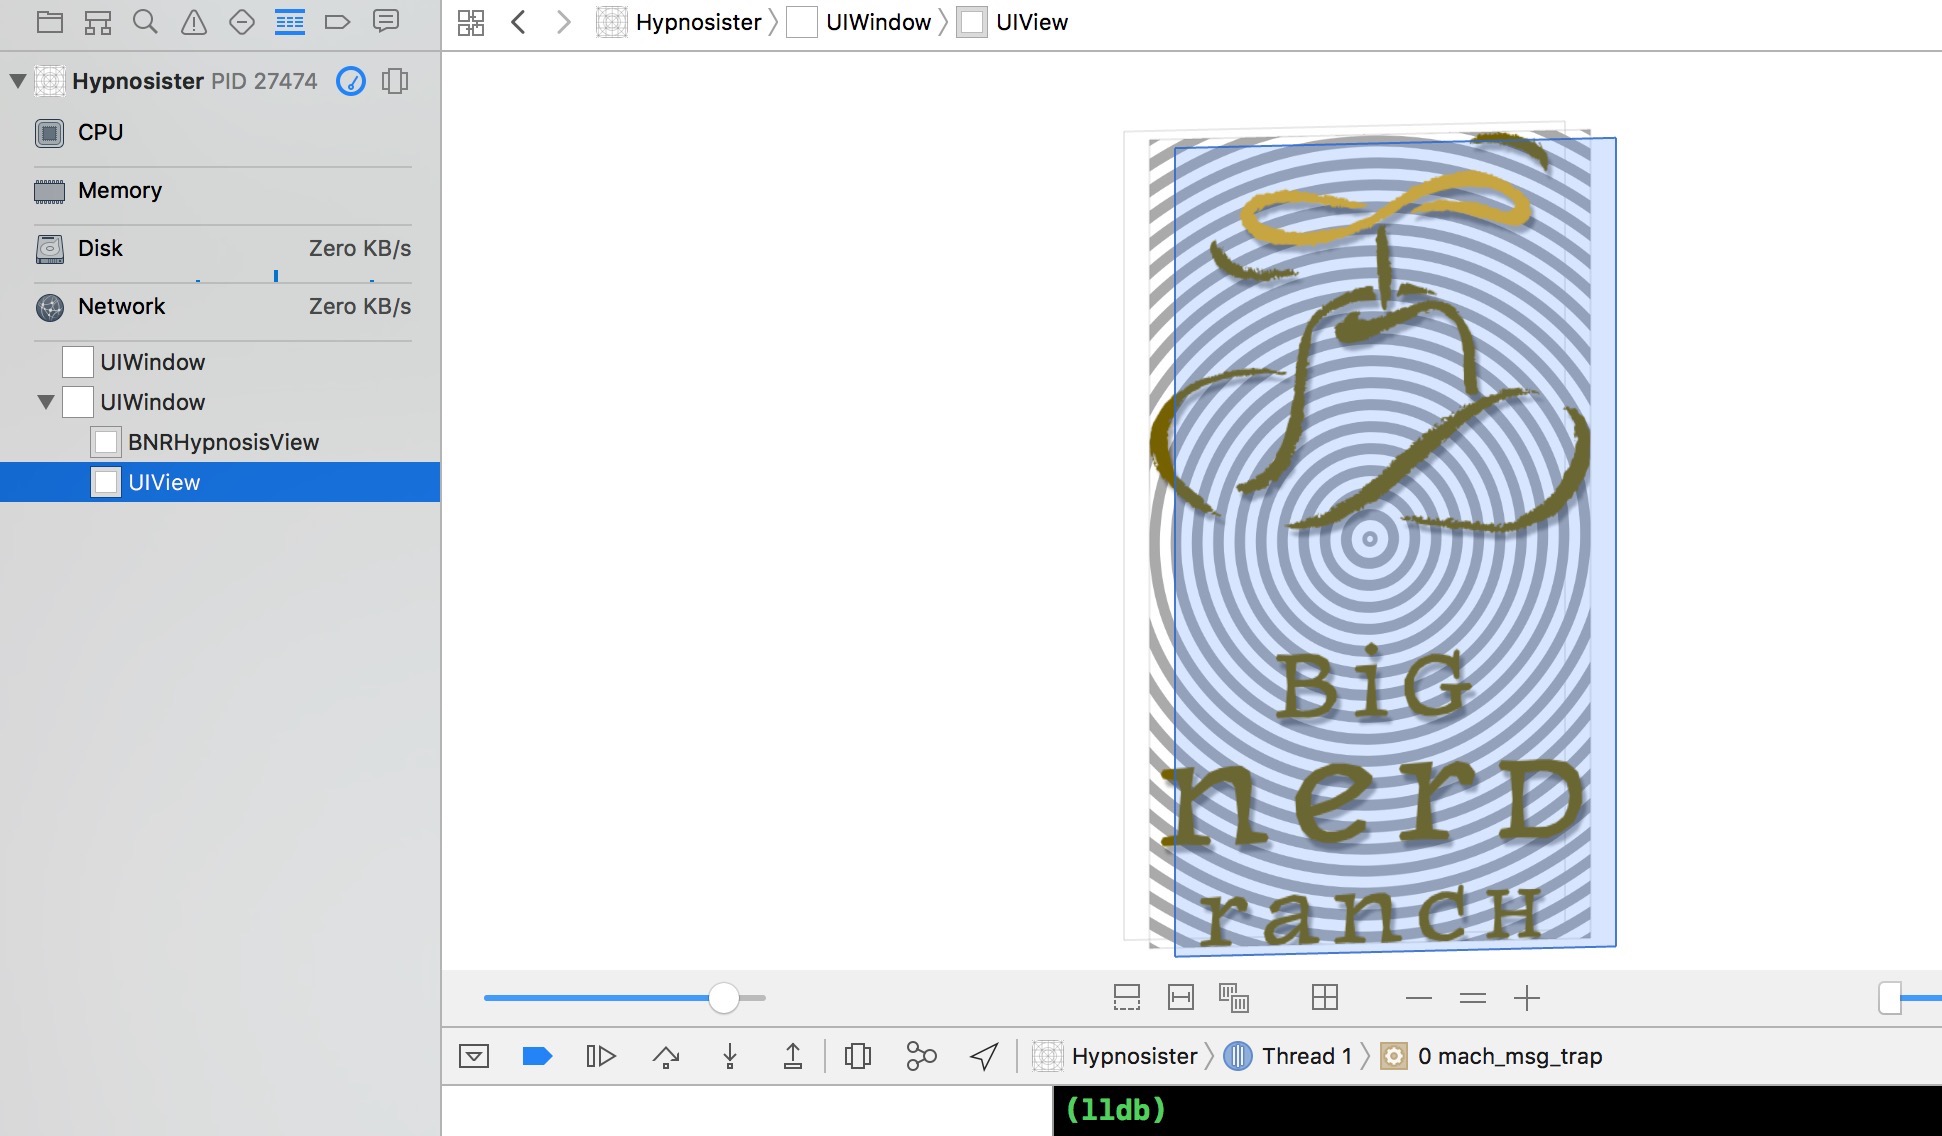
看似很完美的代码,但是一运行,无法响应touchesBegan事件,开始以为是没有开启用户交互,加上开启用户交互self.userInteractionEnabled = YES,仍然没用,后来有人说是这个自定义UIView视图被遮挡,导致无法响应触摸事件,给了我开启视图调试器调试看看的建议,果然,开启视图调试器看到这个自定义UIView确实被遮挡了,如下图所示:
该怎么解决呢?有人说是[self.window makeKeyAndVisible]出了问题,他会把window的rootViewController放到最前面,但我想这肯定是没读懂官方文档对makeKeyAndVisible方法的解释,如下图所示:
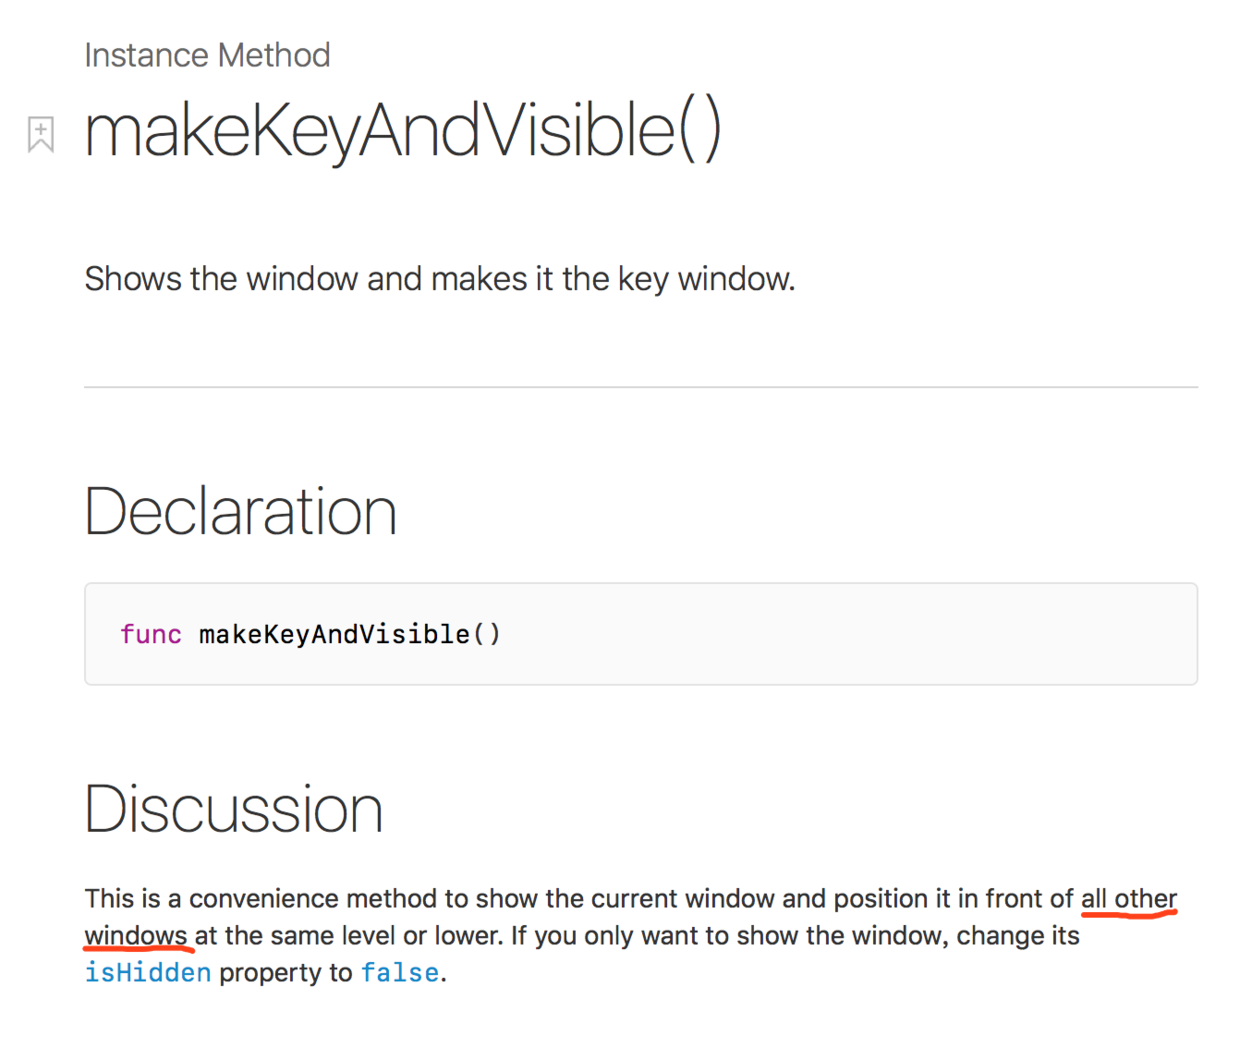
它是UIWindow对象的一个实例方法,是把当前window置于其他window的前面,也就是说是把整个包含了我的自定义UIView的window对象置于最前面,所以,即使注释掉这行代码,仍然无法解决我的自定义UIView被遮挡的问题。
那么问题出在哪里呢?对,问题就出在AppDelegate的下面这段代码中:
NSArray *windows = [[UIApplication sharedApplication] windows];
for(UIWindow *window in windows) {
    if(window.rootViewController == nil){
        UIViewController *vc = [[UIViewController alloc]initWithNibName:nil
                                                                 bundle:nil];
        window.rootViewController = vc;
    }
}
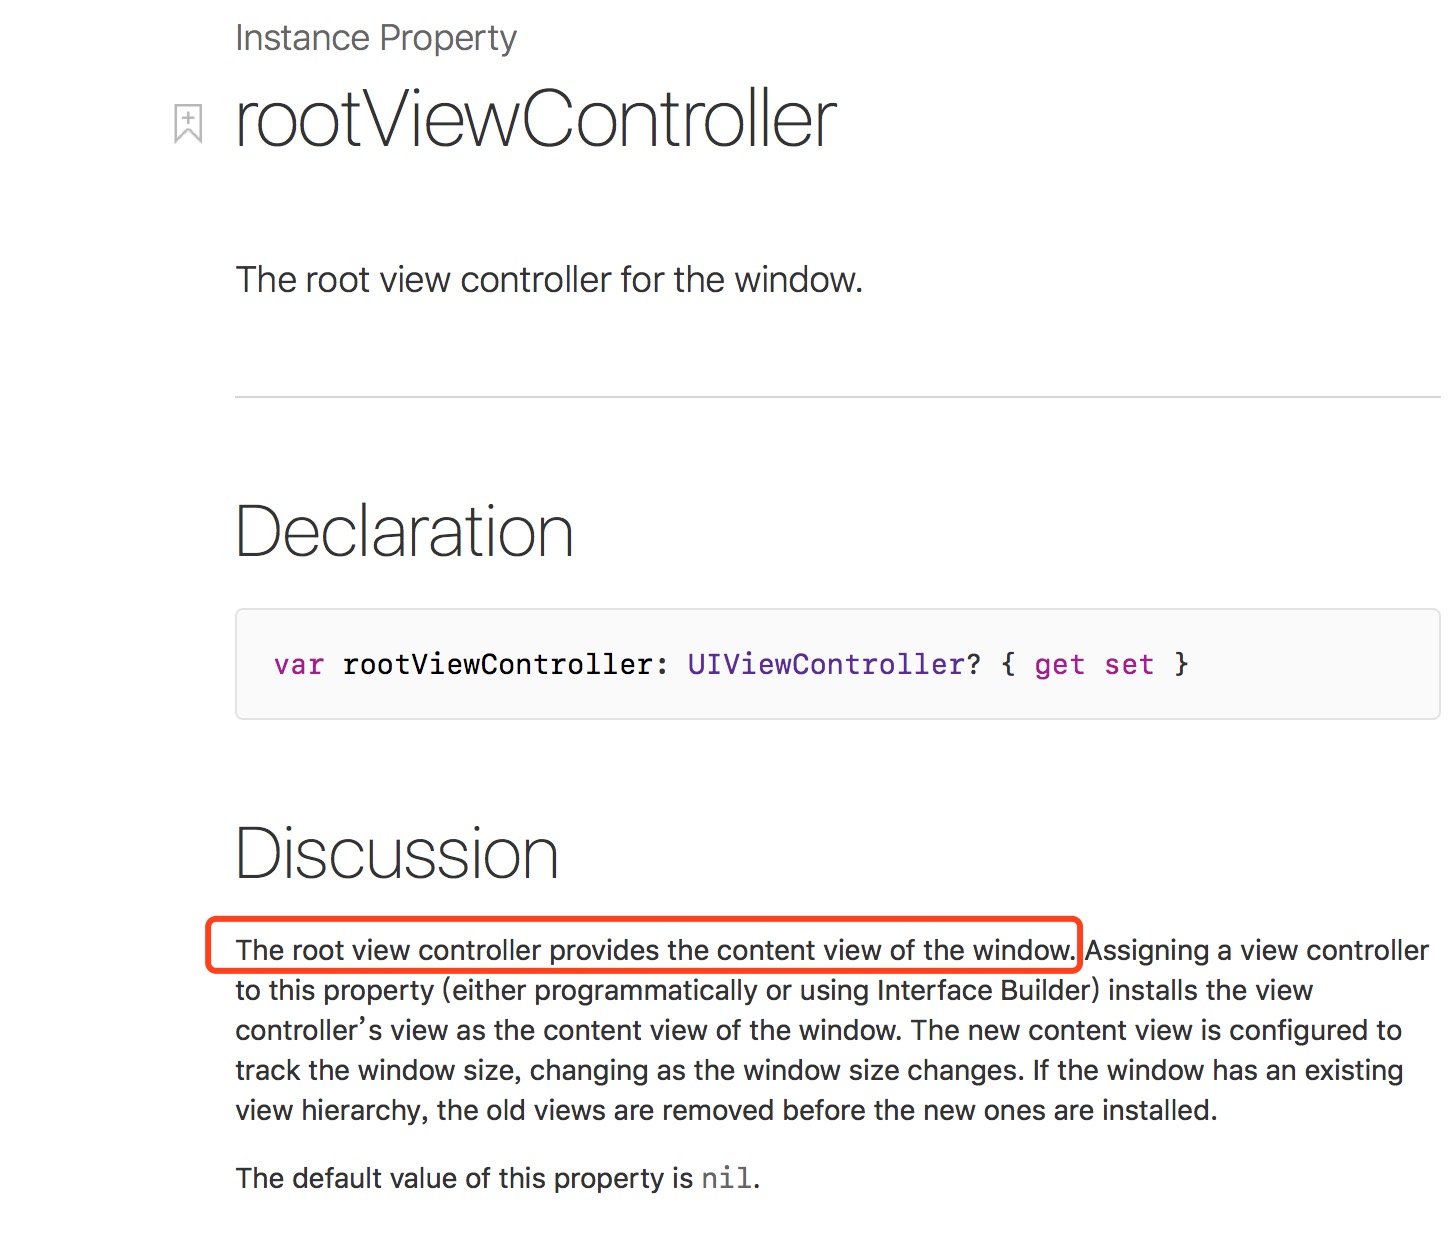
根据上图所示官方文档对rootViewController的说明,可以知道设置了window.rootViewController会给window设定一个content view。根据视图调试器显示出来的内容,这个content view应该也就是一个UIView。所以当这个自定义的UIView添加到self.window上,代码如下所示:
CGRect firstFrame = self.window.bounds;
BNRHypnosisView *firstView = [[BNRHypnosisView alloc] initWithFrame:firstFrame];

[self.window addSubview:firstView];
这个自定义UIView就会被rootViewController设定的content view遮挡,就不能响应触摸事件了。
因此,解决这个问题修改后的关键代码如下所示:
CGRect firstFrame = self.window.bounds;
BNRHypnosisView *firstView = [[BNRHypnosisView alloc] initWithFrame:firstFrame];

[self.window.rootViewController.view addSubview:firstView];
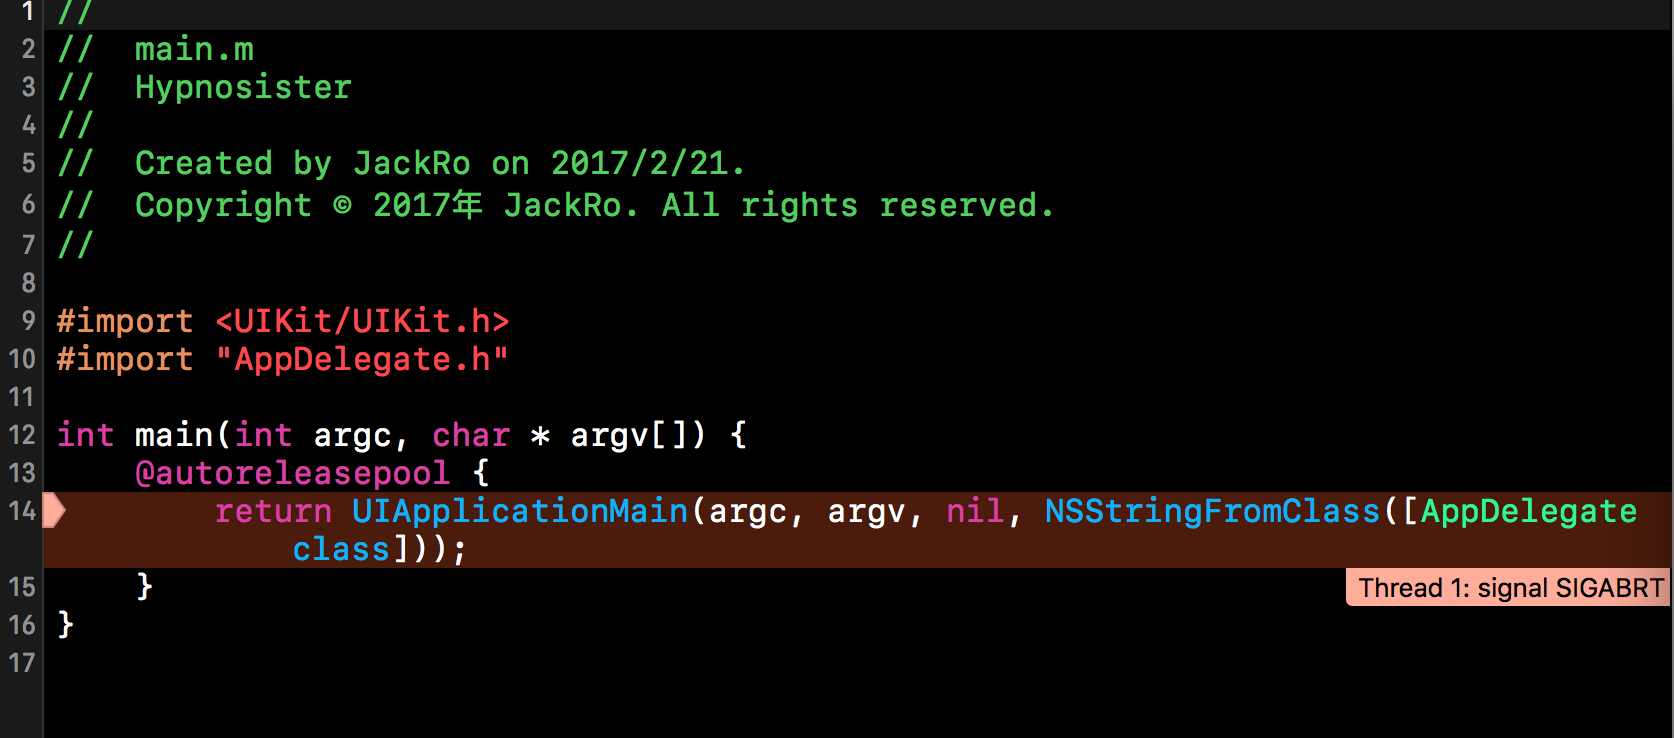
因此如果一些老的项目或者照一些老的iOS教程书籍敲的代码,运行就可能会出现下面的异常:
*** Terminating app due to uncaught exception 'NSInternalInconsistencyException',
reason: 'Application windows are expected to have a root view controller at the end of application launch'
并且app只能打开启动屏,无法进入应用,程序在main函数中停止运行,如下图所示:
这里我碰到这个问题的demo是这样的,有一个自定义view,代码如下:
//
//  BNRHypnosisView.h
//  Hypnosister
//
//  Created by JackRo on 2017/2/21.
//  Copyright © 2017年 JackRo. All rights reserved.
//
#import <UIKit/UIKit.h>

@interface BNRHypnosisView : UIView

@end


//
//  BNRHypnosisView.m
//  Hypnosister
//
//  Created by JackRo on 2017/2/21.
//  Copyright © 2017年 JackRo. All rights reserved.
//

#import "BNRHypnosisView.h"

@implementation BNRHypnosisView

- (instancetype)initWithFrame:(CGRect)frame
{
    self = [super initWithFrame:frame];
    if (self) {
        self.backgroundColor = [UIColor clearColor];
    }
    return self;
}

/*
// Only override drawRect: if you perform custom drawing.
// An empty implementation adversely affects performance during animation.
- (void)drawRect:(CGRect)rect {
    // Drawing code
}
*/

- (void)drawRect:(CGRect)rect {
    CGRect bounds = self.bounds;
    CGPoint center;
    center.x = bounds.origin.x + bounds.size.width / 2.0;
    center.y = bounds.origin.y + bounds.size.height / 2.0;

    float radius = (MIN(bounds.size.width, bounds.size.height) / 2.0);

    UIBezierPath *path = [[UIBezierPath alloc] init];

    [path addArcWithCenter:center radius:radius startAngle:0.0 endAngle:M_PI*2.0 clockwise:YES];

    [path stroke];
}

@end
AppDelegate中代码如下:
- (BOOL)application:(UIApplication *)application didFinishLaunchingWithOptions:(NSDictionary *)launchOptions {
    // Override point for customization after application launch.
    self.window = [[UIWindow alloc] initWithFrame:[[UIScreen mainScreen] bounds]];


    CGRect firstFrame = self.window.bounds;
    BNRHypnosisView *firstView = [[BNRHypnosisView alloc] initWithFrame:firstFrame];
    firstView.backgroundColor = [UIColor redColor];
    [self.window addSubview:firstView];


    self.window.backgroundColor = [UIColor whiteColor];
    [self.window makeKeyAndVisible];
    return YES;
}
根据异常信息的意思,应用就是缺少一个rootViewController,所以在AppDelegate中给应用设置rootViewController就可以了,所以解决后的代码如下所示:
- (BOOL)application:(UIApplication *)application didFinishLaunchingWithOptions:(NSDictionary *)launchOptions {
    // Override point for customization after application launch.
    self.window = [[UIWindow alloc] initWithFrame:[[UIScreen mainScreen] bounds]];

    //-----------------------------------------------------------------------------------------
    //解决该问题的代码
    NSArray *windows = [[UIApplication sharedApplication] windows];
    for(UIWindow *window in windows) {
        if(window.rootViewController == nil){
            UIViewController *vc = [[UIViewController alloc]initWithNibName:nil
                                                                 bundle:nil];
            window.rootViewController = vc;
        }
    }
    //解决该问题的代码
    //----------------------------------------------------------------------------------------

    CGRect firstFrame = self.window.bounds;
    BNRHypnosisView *firstView = [[BNRHypnosisView alloc] initWithFrame:firstFrame];
    firstView.backgroundColor = [UIColor redColor];
    [self.window addSubview:firstView];


    self.window.backgroundColor = [UIColor whiteColor];
    [self.window makeKeyAndVisible];
    return YES;
}
根据官方文档的说明,FloatingActionButton 仅仅支持设置app:fabSize="normal"来改变fab的大小,并且这个fabSize的大小提供了三个可选项(normal,mini和auto)来设置,可以在布局里设置也可以在代码里调用setSize方法进行设置。
这里一开始是想到通过在布局里改变layout_width和layout_height来改变控件的大小的,但是设置之后(两者均设置为100dp,fabSize设置为normal),效果如下所示:
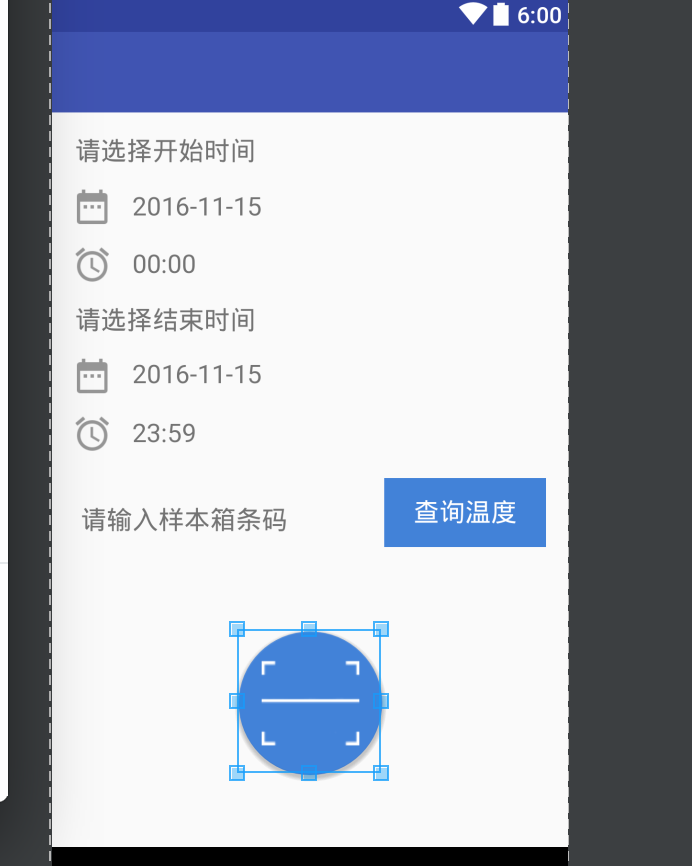
并且当设置了fab的固定宽高再来改变它的fabSize属性(改为mini或auto)时,效果会是fab的图标被撑的很大,甚至边缘都看不到了,显然这样通过固定fab的宽高属性来改变其大小是行不通的。
翻阅FloatingActionButton的源码,其第三个构造函数如下
    public FloatingActionButton(Context context, AttributeSet attrs, int defStyleAttr) {
        super(context, attrs, defStyleAttr);

        ThemeUtils.checkAppCompatTheme(context);

        TypedArray a = context.obtainStyledAttributes(attrs,
                R.styleable.FloatingActionButton, defStyleAttr,
                R.style.Widget_Design_FloatingActionButton);
        mBackgroundTint = a.getColorStateList(R.styleable.FloatingActionButton_backgroundTint);
        mBackgroundTintMode = ViewUtils.parseTintMode(a.getInt(
                R.styleable.FloatingActionButton_backgroundTintMode, -1), null);
        mRippleColor = a.getColor(R.styleable.FloatingActionButton_rippleColor, 0);
        mSize = a.getInt(R.styleable.FloatingActionButton_fabSize, SIZE_AUTO);
        mBorderWidth = a.getDimensionPixelSize(R.styleable.FloatingActionButton_borderWidth, 0);
        final float elevation = a.getDimension(R.styleable.FloatingActionButton_elevation, 0f);
        final float pressedTranslationZ = a.getDimension(
                R.styleable.FloatingActionButton_pressedTranslationZ, 0f);
        mCompatPadding = a.getBoolean(R.styleable.FloatingActionButton_useCompatPadding, false);
        a.recycle();

        mImageHelper = new AppCompatImageHelper(this);
        mImageHelper.loadFromAttributes(attrs, defStyleAttr);

        mMaxImageSize = (int) getResources().getDimension(R.dimen.design_fab_image_size);

        getImpl().setBackgroundDrawable(mBackgroundTint, mBackgroundTintMode,
                mRippleColor, mBorderWidth);
        getImpl().setElevation(elevation);
        getImpl().setPressedTranslationZ(pressedTranslationZ);
    }
都是读取属性来设置一些自定义属性,看到最后三行,发现getImpl方法的调用,它的返回值是FloatingActionButtonImpl,原来fab都是通过FloatingActionButtonImpl来实现其自定义属性的,找到getImpl这个方法,源码如下:
    private FloatingActionButtonImpl getImpl() {
        if (mImpl == null) {
            mImpl = createImpl();
        }
        return mImpl;
    }

    private FloatingActionButtonImpl createImpl() {
        final int sdk = Build.VERSION.SDK_INT;
        if (sdk >= 21) {
            return new FloatingActionButtonLollipop(this, new ShadowDelegateImpl(),
                    ViewUtils.DEFAULT_ANIMATOR_CREATOR);
        } else if (sdk >= 14) {
            return new FloatingActionButtonIcs(this, new ShadowDelegateImpl(),
                    ViewUtils.DEFAULT_ANIMATOR_CREATOR);
        } else {
            return new FloatingActionButtonGingerbread(this, new ShadowDelegateImpl(),
                    ViewUtils.DEFAULT_ANIMATOR_CREATOR);
        }
    }
上面创建FloatingActionButtonImpl每种情况都传递了ShadowDelegateImpl的一个实例,说明这个类对创建FloatingActionButtonImpl很重要,往下看这个类的源码,如下所示:
    private class ShadowDelegateImpl implements ShadowViewDelegate {
        ShadowDelegateImpl() {
        }

        @Override
        public float getRadius() {
            return getSizeDimension() / 2f;
        }

        @Override
        public void setShadowPadding(int left, int top, int right, int bottom) {
            mShadowPadding.set(left, top, right, bottom);
            setPadding(left + mImagePadding, top + mImagePadding,
                    right + mImagePadding, bottom + mImagePadding);
        }

        @Override
        public void setBackgroundDrawable(Drawable background) {
            FloatingActionButton.super.setBackgroundDrawable(background);
        }

        @Override
        public boolean isCompatPaddingEnabled() {
            return mCompatPadding;
        }
    }
这个类里有一个getRadius方法,字面意思理解就是获取半径的,终于柳暗花明,原来fab的大小(即半径)是这个方法来获取的,可以看到它调用了getSizeDimension,下面看这个getSizeDimension方法,源码如下:
    int getSizeDimension() {
        return getSizeDimension(mSize);
    }

    private int getSizeDimension(@Size final int size) {
        final Resources res = getResources();
        switch (size) {
            case SIZE_AUTO:
                // If we're set to auto, grab the size from resources and refresh
                final int width = ConfigurationHelper.getScreenWidthDp(res);
                final int height = ConfigurationHelper.getScreenHeightDp(res);
                return Math.max(width, height) < AUTO_MINI_LARGEST_SCREEN_WIDTH
                        ? getSizeDimension(SIZE_MINI)
                        : getSizeDimension(SIZE_NORMAL);
            case SIZE_MINI:
                return res.getDimensionPixelSize(R.dimen.design_fab_size_mini);
            case SIZE_NORMAL:
            default:
                return res.getDimensionPixelSize(R.dimen.design_fab_size_normal);
        }
    }
原来这里google做的控件也是通过获取资源文件dimens.xml来获取dimen值的(废话,当然是了)。终于看到这里,我才恍然大悟,我可以通过自定义这个design_fab_size_normal来实现覆盖默认的dimen值呀(因为我的布局里是设置fabSize为normal的),自定义代码如下所示:
<dimen name="design_fab_size_normal" tools:ignore="PrivateResource">80dp</dimen>
这样即完美搞定我的fab自定义大小的需求。上张效果图,如下所示:
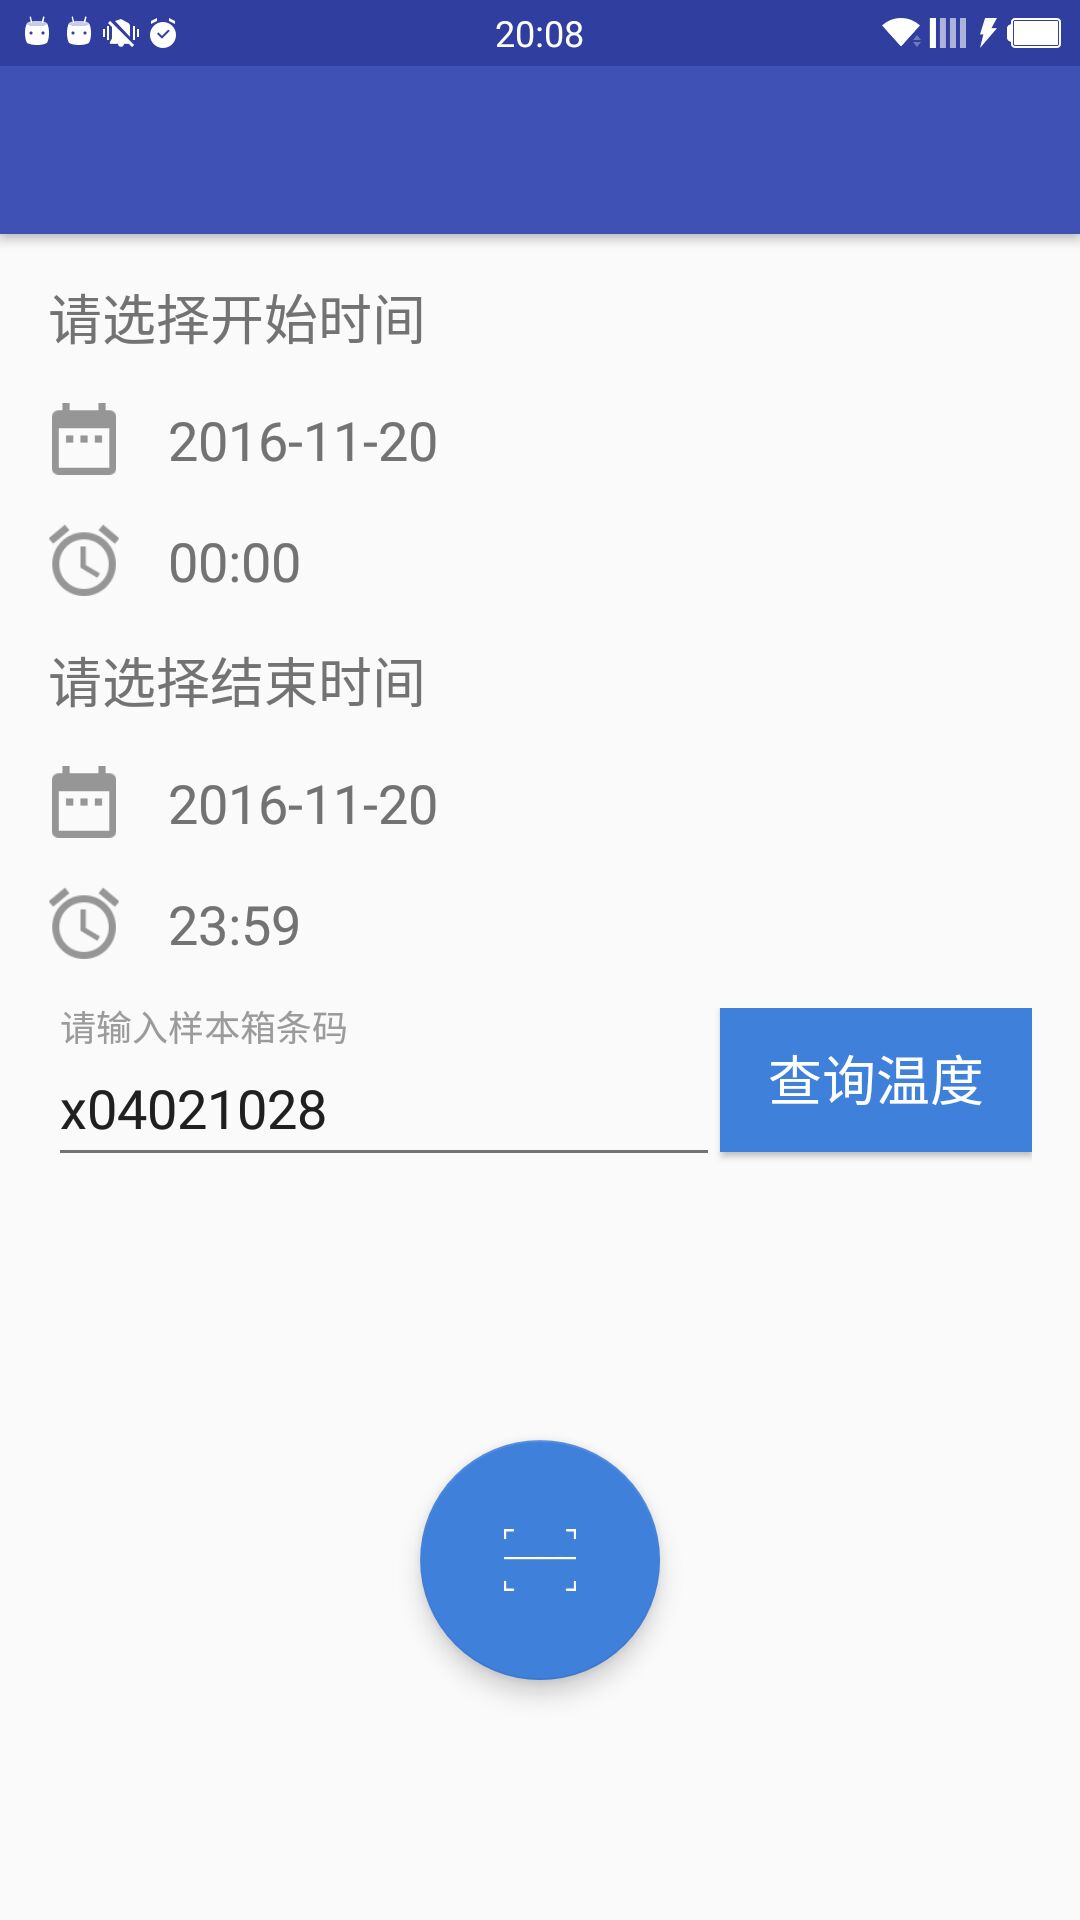
和之前那个设置fab的固定宽高的效果比好多了。
]]>代码如下:
public RightPicClickEditText(Context context) {
    super(context);
    init();
}

public RightPicClickEditText(Context context, AttributeSet attrs) {
    super(context, attrs);
    init();
}

public RightPicClickEditText(Context context, AttributeSet attrs, int defStyleAttr) {
    super(context, attrs, defStyleAttr);
    init();
}
我们或许还需要定义一个右侧图标变量的引用,你可以对这个右侧图标干些自定义的事,代码如下:
/**
 * EditText右侧的图标
 */
protected Drawable mRightDrawable;

private void init() {
    mRightDrawable = getCompoundDrawables()[2];

    if (mRightDrawable == null) {
//这里当没有设置右侧图标时你可以给它设置个默认的右侧图标,当然根据你的项目需求来
        return;
    }

//这里当设置了右侧图标时,我们对图标做了一些自定义设置,你也可以做其他设置
    mRightDrawable.setBounds(0, 0, mRightDrawable.getIntrinsicWidth(), mRightDrawable.getIntrinsicHeight());
}
最关键的来了,我们需要重写自定义EditText的触摸事件onTouchEvent,这里我们通过判断触摸的坐标位置是否在右侧图标范围内来模拟右侧图标的点击事件。如果在这个范围内,则证明点击了右侧图标,为了方便外部调用处理,我们定义了一个接口在这里回调,一旦点击了右侧图标,则触发接口回调。代码如下:
public void setRightPicOnclickListener(RightPicOnclickListener rightPicOnclickListener) {
    this.rightPicOnclickListener = rightPicOnclickListener;
}

public interface RightPicOnclickListener {
    void rightPicClick();
}

private RightPicOnclickListener rightPicOnclickListener;

@Override
public boolean onTouchEvent(MotionEvent event) {
    if (event.getAction() == MotionEvent.ACTION_UP) {
        if (mRightDrawable != null) {
            boolean touchable = event.getX() > (getWidth() - getTotalPaddingRight())
                    && (event.getX() < ((getWidth() - getPaddingRight())));
            if (touchable) {

                //设置点击EditText右侧图标EditText失去焦点,
                // 防止点击EditText右侧图标EditText获得焦点,软键盘弹出
                setFocusableInTouchMode(false);
                setFocusable(false);

                //点击EditText右侧图标事件接口回调
                if (onRightPicClickListener != null) {
                    onRightPicClickListener.rightPicClick(this);
                }
            } else {
                //设置点击EditText输入区域,EditText请求焦点,软键盘弹出,EditText可编辑
                //setFocusableInTouchMode(true);
                //setFocusable(true);
                //设置点击EditText输入区域,EditText不请求焦点,软键盘不弹出,EditText不可编辑
                setFocusableInTouchMode(false);
                setFocusable(false);
            }
        }
    }
    return super.onTouchEvent(event);
}
外部应用就简单了,示例代码如下:
<cn.jackro.rightpicclickedittext.RightPicClickEditText
    android:id="@+id/right_click_et"
    android:layout_width="wrap_content"
    android:layout_height="wrap_content"
    android:layout_gravity="center"
    android:drawableRight="@android:drawable/ic_menu_search"
    android:hint="@string/click_hint"
    android:inputType="text"
    android:maxLines="1"
    tools:ignore="RtlHardcoded"/>

public class MainActivity extends AppCompatActivity implements RightPicClickEditText.OnRightPicClickListener {

    @BindView(R.id.right_click_et)
    RightPicClickEditText mRightClickEt;

    @Override
    protected void onCreate(Bundle savedInstanceState) {
        super.onCreate(savedInstanceState);
        setContentView(R.layout.activity_main);
        ButterKnife.bind(this);
        mRightClickEt.setOnRightPicClickListener(this);
    }

    @Override
    public void rightPicClick(EditText editText) {
        Toast.makeText(this, "点击了搜索按钮", Toast.LENGTH_SHORT).show();
    }
}
实现这样一个功能,我们除了像上面这样干之外,还可以直接使用布局包裹一个EditText和一个ImageView,然后给ImageView设置点击事件即可,这种方法稍微简单点。
]]>java.lang.RuntimeException: Camera is being used after Camera.release() was called
解决代码如下:
@BindView(R.id.sv_preview)
SurfaceView mSvPreview;

private BaseCameraManager cameraManager;

@Override
protected void onResume() {
    super.onResume();

    int hasCameraPermission = ContextCompat.checkSelfPermission(mActivity, Manifest.permission.CAMERA);
    if (hasCameraPermission != PackageManager.PERMISSION_GRANTED) {
        ActivityCompat.requestPermissions(mActivity, new String[]{Manifest.permission.CAMERA},
                MY_PERMISSIONS_REQUEST_CAMERA);
    }

    //region 这里调用初始化照相机并设置SurfaceHolder的回调以解决按下home键或者按下最近应用菜单键再返回扫码界面时相机不显示的问题

    cameraManager = new CameraManager(getApplication());

    setSurfaceViewVisible(true);

    cameraManager.setOnResultListener(this);

    mSvPreview.getHolder().addCallback(this);
    //endregion
}

@Override
public void surfaceDestroyed(SurfaceHolder holder) {

    setEmptyViewVisible(true);
    //解决java.lang.RuntimeException: Camera is being used after Camera.release() was called异常
    holder.removeCallback(this);

    cameraManager.releaseCamera();
}
BaseCameraManager源码如下:
/**
 * CameraManager的基类
 * Created by Jack on 2016/7/1 12:55
 * Email: zhuochangjing@foxmail.com
 */
public abstract class BaseCameraManager {
    private Point qrBoxSize;

    boolean hook = false;
    int rotate;
    int count = 0;
    boolean isRelease = true;
    ExecutorService executor;
    int displayOrientation;
    private MultiFormatReader reader;
    OnResultListener onResultListener;
    protected Context context;

    BaseCameraManager(Context context) {
        this.context = context;
        executor = Executors.newSingleThreadExecutor();
        reader = new MultiFormatReader();
        qrBoxSize = new Point();
        qrBoxSize.x = (int) context.getResources().getDimension(R.dimen.width_qr_box_view);
        qrBoxSize.y = (int) context.getResources().getDimension(R.dimen.height_qr_box_view);
    }

    QRResult getCodeValue(byte[] data, Point previewSize) {
        Bitmap bitmap = null;
        ByteArrayOutputStream stream = new ByteArrayOutputStream(data.length);
        YuvImage image = new YuvImage(data, ImageFormat.NV21, previewSize.x, previewSize.y, null);
        int left = previewSize.x - qrBoxSize.x >> 1;
        int right = previewSize.x + qrBoxSize.x >> 1;
        int top = previewSize.y - qrBoxSize.y >> 1;
        int bottom = previewSize.y + qrBoxSize.y >> 1;
        Rect rect = new Rect(left, top, right, bottom);
        if (image.compressToJpeg(rect, 100, stream)) {
            byte[] bytes = stream.toByteArray();
            bitmap = BitmapFactory.decodeByteArray(bytes, 0, bytes.length);
        }
        try {
            stream.close();
        } catch (IOException e) {
            Log.e("onPreviewFrame", e.toString());
        }

        if (displayOrientation > 0) {
            Matrix matrix = new Matrix();
            matrix.postRotate(displayOrientation);
            assert bitmap != null;
            Bitmap newBitmap = Bitmap.createBitmap(bitmap, 0, 0, bitmap.getWidth(), bitmap.getHeight(), matrix, false);
            bitmap.recycle();
            bitmap = newBitmap;
        }

        assert bitmap != null;
        int width = bitmap.getWidth();
        int height = bitmap.getHeight();
        int[] pixels = new int[width * height];
        bitmap.getPixels(pixels, 0, width, 0, 0, width, height);
        Result result = QRUtils.decode(new RGBLuminanceSource(width, height, pixels), reader);
        if (result != null) {
            return new QRResult(bitmap, result);
        } else {
            bitmap.recycle();
            return null;
        }
    }

    public void setHook(boolean hook) {
        this.hook = hook;
    }

    public void setOnResultListener(OnResultListener onResultListener) {
        this.onResultListener = onResultListener;
    }

    public void shutdownExecutor() {
        executor.shutdown();
    }

    public ExecutorService getExecutor() {
        return executor;
    }

    public void setRotate(int rotate) {
        this.rotate = rotate;
    }

    public abstract void connectCamera(SurfaceHolder surfaceHolder);

    public abstract void setCameraParameter();

    public abstract void startCapture();

    public abstract void releaseCamera();

    public interface OnResultListener {
        void onResult(QRResult qrResult);
    }
}
CameraManager源码如下:
/**
 * This class is for android targets below android 5.0 and it uses old camera api
 * Created by Jack on 2016/7/1 12:55
 * Email: zhuochangjing@foxmail.com
 */
@SuppressWarnings("deprecation")
public class CameraManager extends BaseCameraManager implements Camera.AutoFocusCallback, Camera.PreviewCallback {

    private Camera camera;

    public CameraManager(Context context) {
        super(context);
    }

    @Override
    public void onAutoFocus(boolean success, Camera camera) {
        if (hook || isRelease) return;
        camera.setOneShotPreviewCallback(this);
    }

    @Override
    public void connectCamera(SurfaceHolder surfaceHolder) {
        if (!isRelease) return;
        try {
            camera = Camera.open();
            isRelease = false;
            camera.setPreviewDisplay(surfaceHolder);
            setCameraParameter();
            camera.startPreview();
        } catch (Exception e) {
            throw new RuntimeException(e);
        }
    }

    @Override
    public void releaseCamera() {
        if (isRelease) return;
        isRelease = true;
        camera.setPreviewCallback(null);
        camera.cancelAutoFocus();
        camera.stopPreview();
        try {
            camera.setPreviewDisplay(null);
        } catch (IOException e) {
            throw new RuntimeException(e);
        }
        camera.release();
        camera = null;
    }

    @Override
    public void startCapture() {
        if (hook || isRelease || executor.isShutdown()) return;
        executor.execute(new Runnable() {
            @Override
            public void run() {
                camera.autoFocus(CameraManager.this);
            }
        });
    }

    @Override
    public void setCameraParameter() {
        Camera.CameraInfo cameraInfo = new Camera.CameraInfo();
        Camera.getCameraInfo(0, cameraInfo);
        int degrees = 0;
        switch (rotate) {
            case Surface.ROTATION_0: {
                degrees = 0;
                break;
            }
            case Surface.ROTATION_90: {
                degrees = 90;
                break;
            }
            case Surface.ROTATION_180: {
                degrees = 180;
                break;
            }
            case Surface.ROTATION_270: {
                degrees = 270;
                break;
            }
        }

        if (cameraInfo.facing == Camera.CameraInfo.CAMERA_FACING_FRONT) {
            displayOrientation = (cameraInfo.orientation + degrees) % 360;
            displayOrientation = (360 - displayOrientation) % 360;
        } else {
            displayOrientation = (cameraInfo.orientation - degrees + 360) % 360;
        }

        /** Warning : may throw exception with parameters not supported */
        Camera.Parameters parameters = camera.getParameters();
        List<Camera.Size> previewSizes = parameters.getSupportedPreviewSizes();
        Camera.Size bestSize = previewSizes.get(0);
        for (int i = 1; i < previewSizes.size(); i++) {
            if (previewSizes.get(i).width * previewSizes.get(i).height > bestSize.width * bestSize.height) {
                bestSize = previewSizes.get(i);
            }
        }
        parameters.setPreviewSize(bestSize.width, bestSize.height);

        List<Camera.Size> pictureSizes = parameters.getSupportedPictureSizes();
        bestSize = pictureSizes.get(0);
        for (int i = 1; i < pictureSizes.size(); i++) {
            if (pictureSizes.get(i).width * pictureSizes.get(i).height > bestSize.width * bestSize.height) {
                bestSize = pictureSizes.get(i);
            }
        }
        parameters.setPictureSize(bestSize.width, bestSize.height);
        camera.setParameters(parameters);
        camera.setDisplayOrientation(displayOrientation);
    }

    @Override
    public void onPreviewFrame(final byte[] data, final Camera camera) {
        if (hook || executor.isShutdown()) return;
        Observable
                .just(camera.getParameters().getPreviewSize())
                .subscribeOn(Schedulers.from(executor))
                .map(new Func1<Camera.Size, QRResult>() {
                    @Override
                    public QRResult call(Camera.Size size) {
                        return getCodeValue(data, new Point(size.width, size.height));
                    }
                })
                .observeOn(AndroidSchedulers.mainThread())
                .subscribe(new Action1<QRResult>() {
                    @Override
                    public void call(QRResult qrResult) {
                        if (qrResult == null) {
                            count++;
                            startCapture();
                            return;
                        }
                        QRUtils.vibrate(context);
                        if (onResultListener != null) {
                            onResultListener.onResult(qrResult);
                        }
                        count = 0;
                    }
                }, new Action1<Throwable>() {
                    @Override
                    public void call(Throwable throwable) {
                        Log.e("CameraManager", "getCodeValue() failed .");
                    }
                });
    }
}
解决方法是把百度地图的MapView替换成TextureMapView,卡顿闪屏问题完美解决。
]]>Activity此时已经异常destroy了,此时传递给Service的Intent的参数不会传递成功。所以这里如果你在Service的onStartCommand里用到了Intent传递过来的参数,则需要先判空,否则可能出现空指针异常。
]]>